TLDR
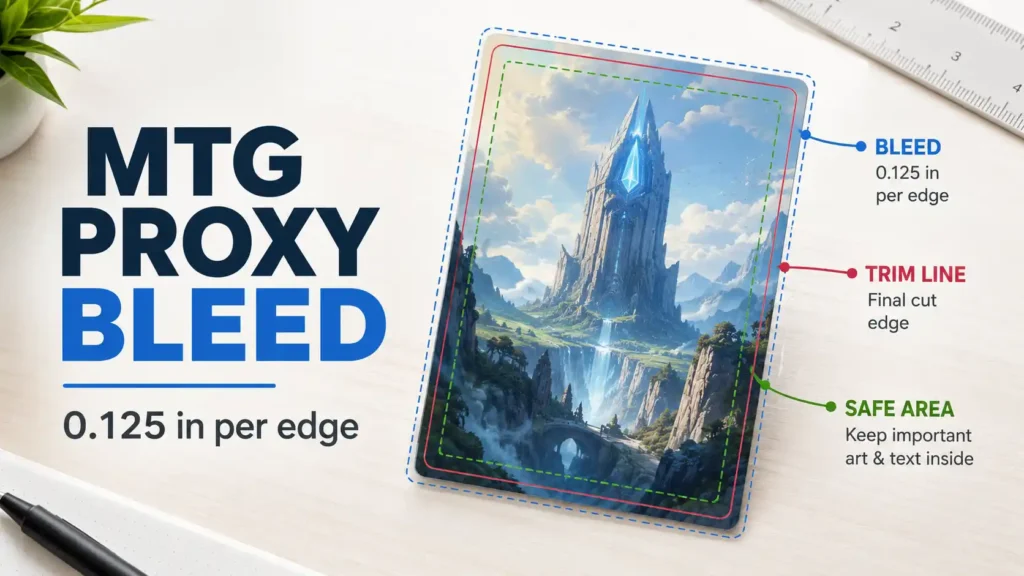
- Use 0.125 inch of bleed on every side as the safest general standard for MTG proxy files. Printers often describe this as approximately 3 mm.
- A 2.5 × 3.5 inch finished card normally needs a 2.75 × 3.75 inch full-bleed file.
- At 300 PPI, use 825 × 1125 pixels. At 600 PPI, use 1650 × 2250 pixels.
- Keep text, mana costs, rules boxes, set symbols, and other important elements at least 0.125 inch inside the trim line.
- A printer’s template overrides the generic rule. Some card printers use slightly different pixel dimensions, such as 822 × 1122.
For most print-ready cards, the correct MTG proxy bleed is 0.125 inch beyond the trim line on all four sides. That extra artwork is intentionally removed during cutting. Its job is to prevent white slivers and unfinished edges when a cut lands slightly away from its intended position.
Bleed is not the most exciting card specification, but neither is opening a 100-card order and finding that every card has acquired an accidental white stripe.
The Direct Answer
A common MTG-sized proxy has a finished trim size of 2.5 × 3.5 inches. Adding 0.125 inch to the left, right, top, and bottom produces a full file measuring 2.75 × 3.75 inches.
The bleed is added to each edge, not to each overall dimension once.
| Specification | Width | Height |
|---|---|---|
| Finished trim size | 2.5 in | 3.5 in |
| Total bleed added | 0.25 in | 0.25 in |
| Full file size | 2.75 in | 3.75 in |
| Resolution | Trim Size | Full Size With Bleed | Bleed Per Edge |
|---|---|---|---|
| 300 PPI | 750 × 1050 px | 825 × 1125 px | 37.5 px |
| 600 PPI | 1500 × 2100 px | 1650 × 2250 px | 75 px |
A raster file cannot contain half a pixel, so a 300 PPI template may place a trim guide 37 pixels from one edge and 38 pixels from the opposite edge. That is normal rounding.
Why Some Printer Templates Use Different Dimensions
The 825 × 1125 pixel canvas is the clean mathematical result for a 2.5 × 3.5 inch card with 0.125-inch bleed at 300 PPI. It is a strong general default, but it is not universal.
Some printers work from metric trim sizes, proprietary cutting layouts, or rounded pixel guides. MakePlayingCards, for example, lists 822 × 1122 pixels as its minimum upload size for a traditional poker-size card and describes a 36-pixel bleed area on each side at 300 PPI.
Use this priority order:
- The exact template supplied for the product
- Written specifications from the printer
- The 0.125-inch general standard
Do not resize a correct vendor template merely to match a generic number from another printer. A few pixels can change how an automated uploader crops or scales the file.
Bleed, Trim, and Safe Area
These three zones solve different problems.
Bleed Area
Bleed sits outside the finished card. Background colors, textures, frames, and edge-to-edge artwork should continue through the entire bleed area. Nothing important should exist only there because the printer expects to cut it away.
Trim Line
The trim line is the intended finished edge. It is a target rather than a guarantee that every cut will land at the exact microscopic center of the line. Commercial cutting always has some tolerance.
Safe Area
The safe area sits inside the trim line. A practical default is to keep essential content at least 0.125 inch inside the finished edge.
For a 2.5 × 3.5 inch card, that creates an inner safe box of approximately 2.25 × 3.25 inches, or about 675 × 975 pixels at 300 PPI.
Keep card names, mana costs, rules text, power and toughness boxes, set symbols, proxy labels, and important artwork details inside this zone.
Bleed protects the edge from showing unprinted stock. Safe area protects important content from being clipped. One does not replace the other.
A Practical 300 PPI File Map
| Zone | Size | Purpose |
|---|---|---|
| Full canvas | 825 × 1125 px | Includes disposable bleed |
| Intended trim | 750 × 1050 px | Represents the finished card |
| Recommended safe box | About 675 × 975 px | Holds essential content |
The source file normally remains rectangular. The printer’s cutter creates the rounded corners through the bleed area. Do not stop the background at a digitally rounded corner unless the printer’s template specifically requires that setup.
How To Add Bleed Correctly
The best approach is to build the card with bleed from the beginning. Set the document to the finished trim size, add 0.125 inch of bleed, and extend only the background and edge artwork beyond the trim line.
Do not simply enlarge the entire completed card until it fills a larger canvas. That also enlarges the frame, text, icons, and rules box, potentially changing the intended layout and cropping important details.
For an existing flattened image without bleed, extend the background rather than the whole card. Depending on the design, this may involve continuing a solid color, gradient, texture, or edge artwork into the new outer area. A mirrored or blurred edge extension can work for abstract backgrounds, but it should not create a visible halo at the trim line.
Always preview the design with the bleed hidden. The finished card matters more than the disposable outer border.
Why Thin Borders Still Look Uneven
A file can have perfect MTG proxy bleed and still produce visibly uneven borders.
Bleed prevents exposed white stock. It does not force the cutter to center a narrow frame perfectly. PrintNinja specifically warns that a uniform 0.125-inch border can make ordinary trim variation easy to see.
For MTG-style layouts, consider using a wider border, edge-to-edge artwork, or fewer thin decorative lines close to the trim. Adding more bleed will not make a narrow border more even. It only gives the cutter more printed artwork to cut through.
Setting Up Common File Types
InDesign or Illustrator
Create the document at 2.5 × 3.5 inches and set bleed to 0.125 inch on all sides. Extend the background to the bleed guides and export using the document bleed settings.
Include crop marks only when the printer asks for them. Some commercial PDF workflows want marks, while individual-card uploaders often use their own guides.
Photoshop or Other Raster Editors
For a generic 300 PPI workflow, create an 825 × 1125 pixel canvas and use trim guides around a central 750 × 1050 pixel area. At 600 PPI, use 1650 × 2250 pixels with 75 pixels of bleed per edge.
Use a printer-supplied template whenever possible so pixel rounding is already handled correctly.
Online Card Makers and Uploaders
Check the preview carefully. Confirm that artwork reaches every cut boundary, text remains inside the safe guide, and the uploader has not enlarged the image enough to crop frame details.
A green approval indicator usually means the file meets minimum upload rules. It does not guarantee sharp source art, centered borders, or strong print quality.
Do Card Backs Need Bleed?
Yes. A custom card back needs the same bleed treatment whenever its background reaches the edge.
Keep logos, proxy notices, and centered back designs comfortably inside the safe area because front-to-back registration can also shift slightly. Custom backs or clear proxy markings help prevent the cards from being confused with authentic Magic cards outside casual or playtesting use.
Common Bleed Mistakes
| Mistake | Result |
|---|---|
| Adding only 0.125 inch to the total width and height | Bleed is only half as large as intended |
| Expanding the canvas without extending the artwork | White edges remain possible |
| Scaling the entire card to create bleed | Frames and text become enlarged or cropped |
| Placing important content in the bleed | Content may be cut away |
| Ignoring the safe area | Text or symbols can be clipped |
| Leaving template guides visible | Guide lines may print on the card |
| Reusing one printer’s dimensions everywhere | The uploader may crop or rescale the file |
Preflight Checklist
Before uploading a deck, confirm that:
- The correct product template was used
- The trim size matches the selected card product
- Bleed extends around all four edges
- Background artwork reaches the outer bleed boundary
- Important content stays inside the safe area
- Fronts and backs use matching dimensions and orientation
- Thin borders have enough width to tolerate minor cutting variation
- Template guides and labels are hidden in the final export
- The uploader preview does not crop names, symbols, or rules text
- One card has been proofed before committing to a large custom order
Final Recommendation
Use 0.125 inch, or approximately 3 mm, of bleed on every side unless the printer specifies otherwise. For a 2.5 × 3.5 inch trim size, that normally means a 2.75 × 3.75 inch file, or 825 × 1125 pixels at 300 PPI.
That is the best general MTG proxy bleed specification, but the printer’s current template should always win. It accounts for the actual product, uploader, cutting process, and rounding method.
Correct bleed does not guarantee sharp printing, accurate color, strong cardstock, or perfect centering. It solves one specific problem: keeping the finished edge fully printed when the cut moves slightly.
FAQs
Is 3 mm the Same as 0.125 Inch?
Not exactly. Three millimeters equals about 0.118 inch, while 0.125 inch equals about 3.175 mm. Printers commonly treat them as equivalent standards, but the exact template value should be used without unnecessary conversion.
Can I Print an MTG Proxy File Without Bleed?
You can, but a slight cutting shift may expose a white or unprinted edge. Files without bleed are safest only when the design includes a generous intentional border and the printer approves the setup.
Do Bordered Cards Still Need Bleed?
Yes. The outer background or border should continue beyond the trim line. Bleed prevents exposed stock, while the visible border must be wide enough to tolerate off-center cutting.
Should I Use 825 × 1125 or 822 × 1122 Pixels?
Use the size required by the selected printer. Use 825 × 1125 for a generic 2.5 × 3.5 inch, 300 PPI workflow with exact 0.125-inch bleed. Use 822 × 1122 when the printer’s template or uploader specifies it.
Should Crop Marks Be Included?
Only when the printer requests them. Individual-card uploaders usually rely on built-in guides, while some commercial PDF workflows require crop marks during export.
References
- MTG Card Size, Bleed, and Safe Zone: The Print Spec Cheat Sheet, PrintMTG. Supports the 2.5 × 3.5 inch trim size, 0.125-inch bleed, 2.75 × 3.75 inch canvas, 825 × 1125 pixel file, and safe-area guidance. Accessed July 22, 2026.
https://printmtg.com/mtg-card-size-bleed-and-safe-zone/ - FAQ on Digital Photos, Pixels and Image File Types, MakePlayingCards. Lists a minimum 822 × 1122 pixel upload for traditional poker-size cards and describes 36-pixel bleed and safe-area guides at 300 PPI. Accessed July 22, 2026.
https://www.makeplayingcards.com/faq-photo.aspx - Design Your Own Game Cards: Traditional Poker Size, MakePlayingCards. Specifies 1/8-inch bleed and a further 1/8-inch safe-area margin on each side. Accessed July 22, 2026.
https://www.makeplayingcards.com/design/custom-blank-card-traditional-size.html - Card Deck Setup Guides, PrintNinja. Specifies 0.125-inch bleed and margin, and explains why narrow uniform borders may look uneven after ordinary trimming variation. Accessed July 22, 2026.
https://printninja.com/card-deck-setup-guides/ - Set a Print Bleed, Adobe. Explains the purpose of bleed, identifies 0.125 inch or 3 mm as standard values, and provides PDF export guidance. Accessed July 22, 2026.
https://www.adobe.com/learn/indesign/web/set-print-bleed